Originally published . First publication. If you've been waiting for more content after the talk, here it is! If you're only curious about the new stuff, here's a list:
Parity in path puzzles: More concrete theorem statements with proofs.
Parity coloring: The example from A Monster's Expedition is one section, but there are several new sections based on region division puzzles.
Topology: The teaser from my talk is here! The checkerboard lemma explained, together with Jordan curve theorem.
Gridpoint counting: This is mostly identical, but there's one (difficult) puzzle taken from my archives to test your understanding.
There may even be more content planned, I just want to get this one out for now.
On , I gave a talk for ThinkyCon titled Mathematics for Puzzles. (Watch the VOD, and check out the rest of the great talks!) It was about various examples of how mathematics pop up in puzzles, how certain logical deductions can be made by understanding mathematics. It was a fun talk, and it was positively received.
While preparing the talk, I found a lot of material. There were a lot of examples I could share, and there wasn't enough time to cover them. So I discussed a few during the talk, and left up a slide teasing other examples I would have loved to get into.
The good thing is that I have this website, where I have no time or character limit. So I figured, I can present my talk in text form. I can get into the examples I didn't manage to discuss. I can expand mathematical arguments to be more rigorous and convincing. I can structure the article better. And this is what you're reading.
This article is an expanded form of my talk. If you watched my talk, some of the content will be familiar, but there is still plenty of new stuff. If you haven't, then most, if not all, of the content in the talk should be included here as well.
NOTE: The talk was originally aimed for puzzle game developers. This is still mostly true for this article. At the same time, I'm much more well-versed in logic puzzles, and a lot of these examples actually come from logic puzzles. Since my audience might not have the same level of understanding as I do, I try my best to get my arguments to a more basic level. If you're already familiar with logic puzzles, some of this content might sound trivial; just bear with it, it might not be so for others.
Puzzles are fun! Puzzles challenge our minds. It's satisfying to solve them.
Some people consider them a waste, though. Well, I think those people need to find some joy in their life. It's still worth asking, though, do puzzles have offer more than a fun diversion? The answer is unquestionably yes.
There has been a lot of research about how puzzles can be used for more "serious" purposes. Being brain teasers, puzzles help train our critical thinking and problem solving skills. Puzzles have a close connection to mathematical problems: they are about deriving a solution given the rules we're allowed to work with, whether it's mathematical axioms, puzzle rules, game mechanics, or something else. Progress is often incremental, building up from small deductions based on the rules, into larger and larger steps that can finally be chained together into a full solution. This is the same as math: working from axioms or base facts, building up into larger and larger theorems.
Puzzles can also incorporate math topics. Mathematics is a subject that is often known to be "dry" and boring. It is pretty abstract, which might be difficult for people to understand. Puzzles can help put these mathematical topics in a more concrete setting, making them not only easier to understand, but showing various applications of them. Turns out, there are a lot of mathematics that can be found in puzzles that we do.
And that's exactly what I want to talk about in this article. I will show various examples of how you can find mathematics embedded inside puzzles, so that the quest of solving the puzzle will lead you to discover and do mathematics. If you can do math while doing puzzles, that's certainly not a waste of time, yes?
During the talk, I also emphasized, to the audience of puzzle game developers, that they should also try to find such hidden mathematical theory in their ruleset. Whether they were making a puzzle game, writing puzzles of a particular genre, or anything else. Dig deep into the rules and their implications, figure out what beautiful theories were waiting to be discovered. To be honest, this wasn't the point of the talk; I just wanted to share these examples. But I do hope these will still motivate you to think about your own puzzles either way.
Parity in path puzzles
All ways to continue a path are the same color
Parity is an incredibly important concept in mathematics. An integer is either even or odd. Looking at the set of {even, odd}, we have the equations even + even = odd + odd = even, and even + odd = odd. These equations on parity are very useful and have been applied for other cases, such as parity of a permutation.
One notable property of parity is the "flip-flop" nature. Stepping through the integers, you alternate between even and odd. And this oscillating nature of parity is very useful in puzzles, with its power best shown in path puzzles.
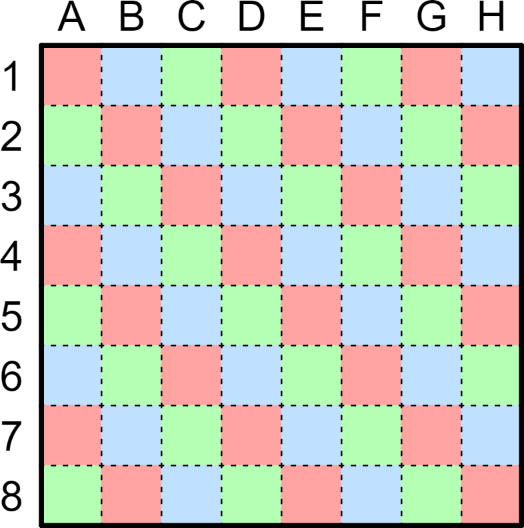
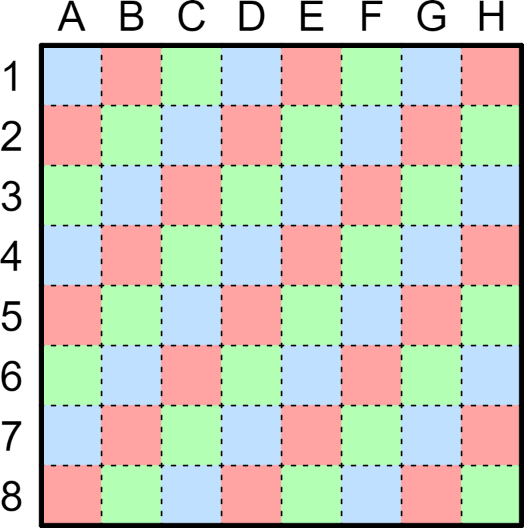
A lot of puzzles involve drawing a path on a square grid that travel along adjacent cells. We can make use of parity, by coloring the grid in a checkerboard fashion. There are often several options to continue a path, but all of them will always be onto a cell of the opposite color. In mathematical terms, this is an invariant. This fact doesn't change, regardless of our path.
An invariant is a powerful thing in mathematics. There are a lot of deductions and logic that come from recognizing this invariant, as you will see below.
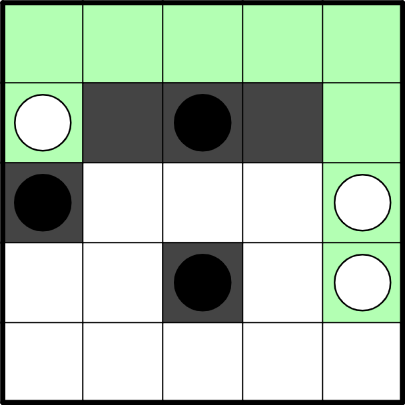
Alcazar
Alcazar example puzzle
(Click to try solving)
To showcase the logic in puzzles, I will need a puzzle genre, a set of rules to work with. I decided to choose a puzzle game called Alcazar.
Alcazar was a mobile game that was sadly discontinued in 2017. I remember playing it, though, and it was quite a delightful set of logic puzzles.
One example puzzle is shown. The goal is to draw a single path from one of the exits to another, such that it visits all the cells exactly once. The path may only go through orthogonally adjacent cells (that is, cells sharing a side, not just a point; it also means the path must be going only horizontally and vertically). There are some walls inside the grid; the path may not go through the walls. In some puzzles, some cells might also be removed from the grid. All puzzles are supposed to have a unique solution; this is also the standard for logic pencil puzzles.
One thing I love from Alcazar is its simplicity. The rules are very intuitive: it's basically solving a maze, and obviously you can't cross a wall. And yet, despite the straightforward rules, it has some rather deep and fascinating logic. It's possible to present a puzzle that looks impenetrable, but by knowing these hidden deduction steps, it becomes much more approachable. (In addition, since I presented this for an audience of puzzle game developers, using an actual puzzle game is always a plus.)
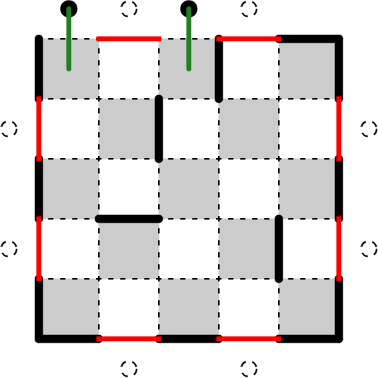
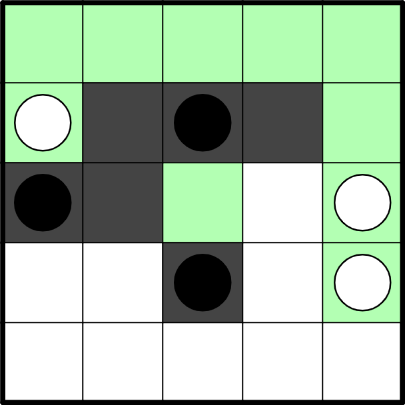
Alcazar puzzle, by me
(Click to try solving)
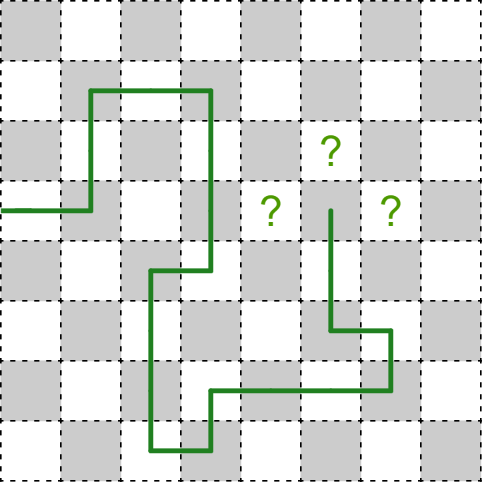
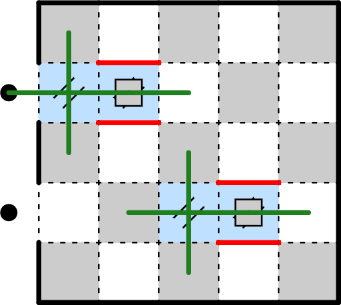
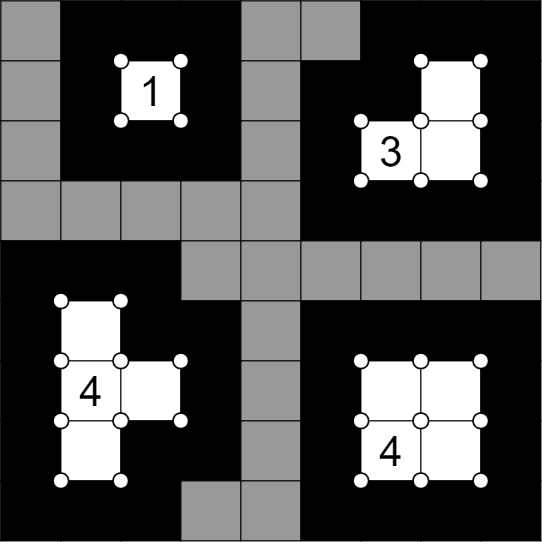
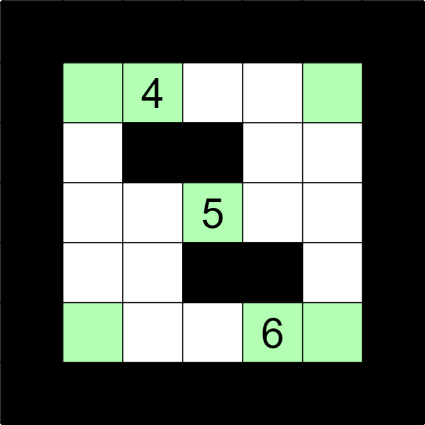
In fact, I will present one such puzzle right now. Here's an unassuming 5x5 puzzle. (I presented this same puzzle for my talk.) You can try doing it yourself; just click on the image! Unfortunately, it's not as pretty as how Alcazar looks in the actual app, but that's not the point. (The dots indicate exits. The board is colored in a checkerboard manner to match how it looks in the game.)
Since it is a logic puzzle, you shouldn't resort to guessing; you should be able to definitively prove that your solution is the only possible solution.
If you don't know the tricks of Alcazar, specifically about parity, you will likely get stuck. There are very few walls, and it looks like everything is so open that you can draw a bunch of paths, only for all of them to get stuck one way or another — a cell missed, a path unable to leave the grid, and so on. So how can you actually solve the puzzle? Read on.
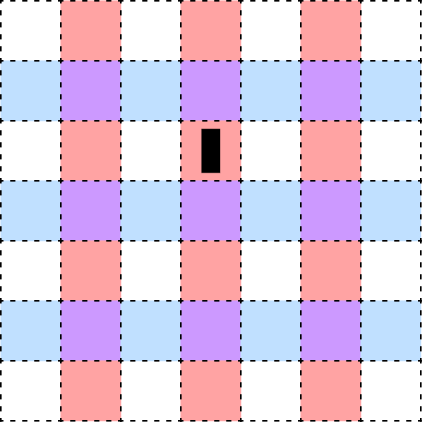
Two simple examples
Which exits does the path must use?
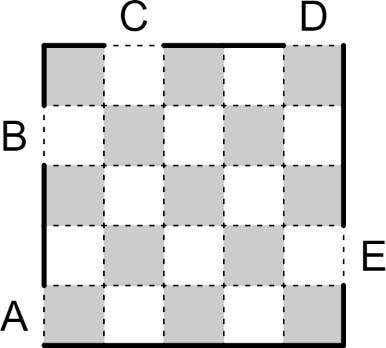
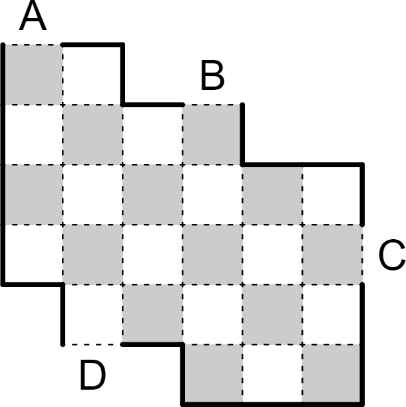
Consider this first example. The rules are the same as Alcazar: draw a path starting from one exit to another that visits all the cells exactly once. Although, it's not guaranteed there's a unique solution. Instead, the question is about exits. Among the many labeled exits, which exits must the path use?
Since we have discussed parity, we will now make use of it. The board has been colored in a checkerboard manner. As mentioned before, the path is going to alternate between the two colors. We will make use of the fact that the path visits all cells. This will allow us to figure out the color of each cell along the path.
Let's pair up the cells of the path. The 1st and the 2nd cells will be of opposite colors, because the path always alternates colors. Likewise, the 3rd and the 4th cells will be of opposite colors. Then the 5th and 6th, then the 7th and 8th, and so on.
Since the path visits all the cells, it will have 25 cells. So we end up pairing the 23rd and 24th cells, and we leave the 25th cell unpaired.
Now we count the colors of the cells. There are 13 dark cells and 12 light cells. But in each pair of cells mentioned earlier, we know they are of opposite colors, so each pair contributes 1 dark cell and 1 light cell. That means the 12 pairs will contribute 12 dark cells and 12 light cells total. The last unpaired cell, the 25th, will be a dark cell, to complete the count.
Notice how we can do all this without even considering how the path goes on the grid! There are a lot of ways the path might go. But every single such path will always alternate colors, and this fact is what we're using.
What does having the 25th cell being dark tell us? Since the 25th cell is the last cell of the path, it means the path leaves the grid after that. That means the path uses a dark exit.
We don't have to stop there, though. Since we know the path alternates colors, because the 25th cell is dark, it follows the 24th cell is light. And so the 23rd cell is dark, the 22nd cell is light, the 21st cell is dark... Following this all the way to the beginning, we find out the 1st cell is dark. This is the start of the path, so the path also uses a dark exit to enter the grid.
That means the path uses two dark exits. Despite the grid having five exits, only two of them are dark exits. So we know the path must use exits A and D. The exits B, C, E are fake and are not used.
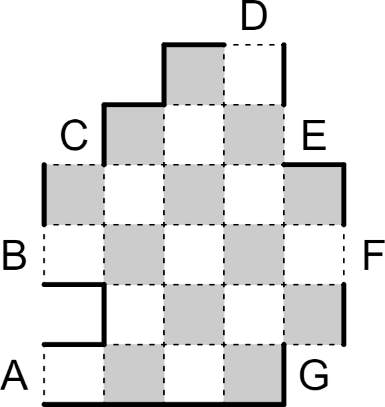
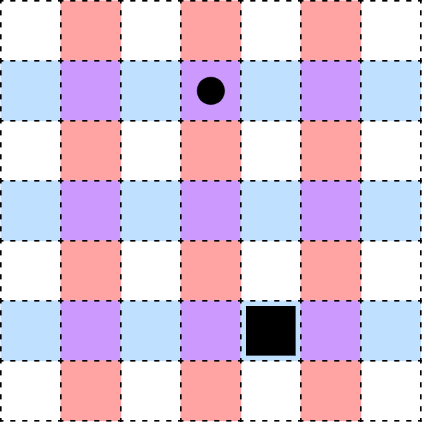
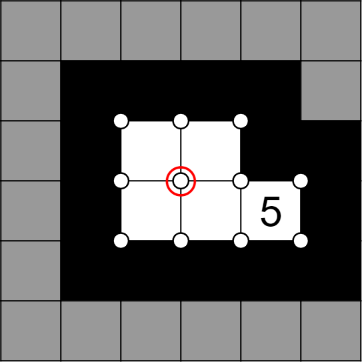
Which exit does the path must use?
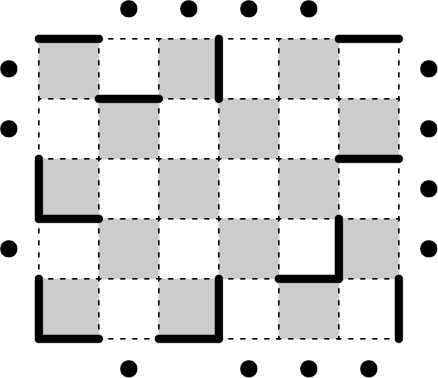
If you analyze the above argument carefully, we use the fact that the path visits all cells, so that we can count up the colors and decide based on that. But nothing about the argument says the grid has to be rectangular! As long as we use all the cells, it doesn't matter how funny the grid looks like.
Consider this second example. The grid looks pretty wild, but that doesn't matter for us. Counting up the cells, this time we find 13 dark cells and 13 light cells. The counts are now equal. Can we pair up the cells?
We can pair up the cells, but doing it the obvious way — 1st and 2nd, then 3rd and 4th, and so on — won't lead to anything. We have to be slightly more tricky: we skip the 1st cell and pair up the rest. So we pair up 2nd and 3rd, then 4th and 5th, and so on. The 1st cell remains unpaired, and when we continue this all the way, we find the last cell, the 26th, also remains unpaired.
However, we know there are 13 dark cells and 13 light cells. The 12 pairs account for 12 dark cells and 12 light cells. Therefore, there is 1 dark and 1 light cell remaining, which must go to the 1st and 26th cells. In a way, these two cells form a pair too.
What are these cells? Well, the 1st cell is the start of the path and the 26th cell is the end of the path. That means these are the two endpoints of the path! What we have proven is that the path will start and end on opposite colors: one of them is dark, the other is light.
Looking back at the grid, we can see three dark exits (A, B, C), but only one light exit (D). Therefore, the path must use exit D, since we must have a light exit. We don't know which of the three dark exits is used — there is a solution for any of them — but we know the only light exit D must be used.
The exact counts of the dark cells and light cells aren't that important. What's more important is the difference between the two, and it's useful to define this quantity: the dark excess is how many more dark cells we have than light cells. (If we have more light cells than dark cells, then the dark excess is negative.)
We can formalize what we've discussed in a theorem:
Following the rules of Alcazar, one of the following is true:
If the dark excess is +1, then it's a dark-dark path: the two exits are on dark cells.
If the dark excess is =0, then it's a dark-light path: the two exits are on opposite colors.
If the dark excess is −1, then it's a light-light path: the two exits are on light cells.
It's impossible for the dark excess to be greater than +1 or less then −1. At least, if there's only one path.
That said, the power of this theorem comes from how much more it can be generalized, as in the following section.
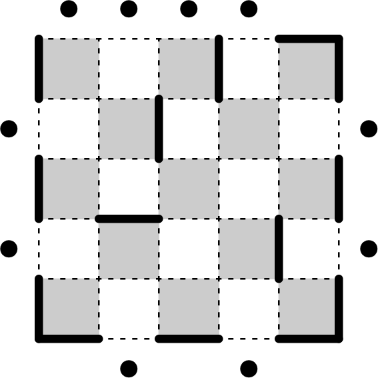
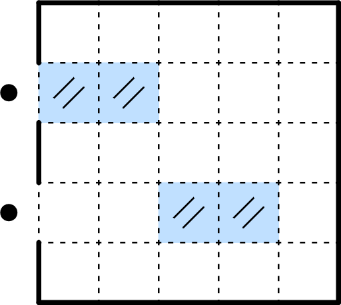
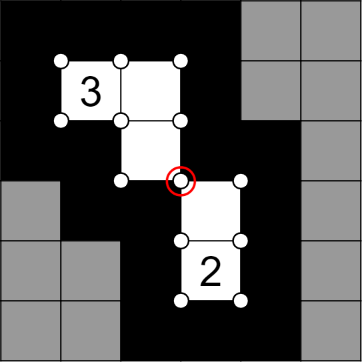
Example with multiple paths
There may be multiple paths. Which exits are used?
Consider the following example. Unlike in previous examples, there may be multiple paths. But all cells must still be visited exactly once, which also implies the paths can't intersect or overlap or anything.
The theorem from the previous section is still true! And having multiple paths is fine, because they are additive: we can add up the dark excesses of the paths, and the sum should be the dark excess of the whole grid.
In this example, the dark excess is +1 (there are 12 dark cells and 11 light cells). So the sum of the dark excesses must be 1. This means we have at least one dark-dark path. There may be more dark-dark paths, if there are an equal number of light-light paths to cancel the dark excesses. Finally, there might be dark-light paths.
However, it should be clear that exit A in the bottom-left will be used; that's the only way to use the cell. This is a light exit! So one of our paths will have at least a light exit; this is not the dark-dark path. What are our options?
It might be a light-light path. Then, as mentioned before, we have to pair it off with a dark-dark path, in addition to the one dark-dark path to get a dark excess of +1. So we end up with at least two dark-dark paths. But this is impossible; there are only 3 dark exits on the grid.
So it's a dark-light path, which doesn't affect the dark excess. We also have the dark-dark path to give a dark excess of +1. In total, these paths together use 3 dark exits, which is everything we have. That means all the dark exits are used.
Is there any other path? Well, we run out of dark exits, so we can't have any dark-dark path or dark-light path. And a light-light path will reduce our dark excess, but we can't raise it because we can't have any more dark-dark path. So these are all our paths; there's no other path.
As a result, the exits used are A, C, E, G: exit A because it's used to visit the bottom-left cell, and exits C, E, G to count up the 3 dark exits we need.
Instead of talking about paths, it's more convenient to talk about the exits being used. In this case, the theorem becomes extremely straightforward:
If the dark excess is N, then there are exactly 2N more dark exits than light exits. (If N is negative, then there are more light exits than dark exits.)
You can verify this from the previous theorem. For example, the first case of dark excess +1 gives 2 dark exits and 0 light exits, so there are 2 more dark exits than light exits as a result. Adding up the dark excesses, as well as the dark exits and light exits, will give this.
In practice, the addition of dark-light paths "for free" makes it difficult to count the exact number of dark/light exits. Instead, we rely on the lower bound:
Corollary of the theorem:
If the dark excess is +N, then there are at least 2N dark exits.
If the dark excess is =0, then there is at least 1 exit of each color (unless the area is completely empty).
If the dark excess is −N, then there are at least 2N light exits.
The first and third cases are simply because exits of a color can't be lower than 0. The second case uses the fact that the number of dark exits and light exits are the same; but if an area has to be visited, it has to have at least one path coming in, so there must be some exit somewhere. That gives us the 1 exit of each color.
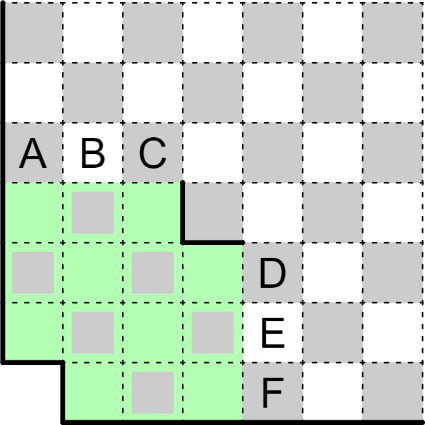
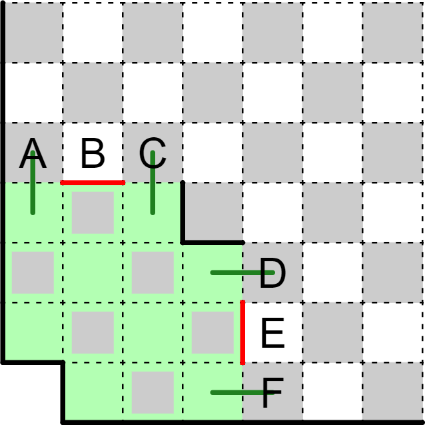
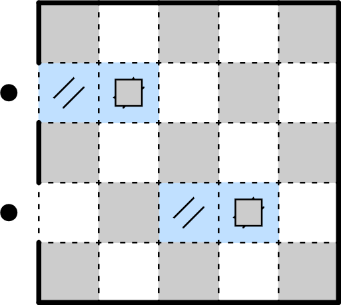
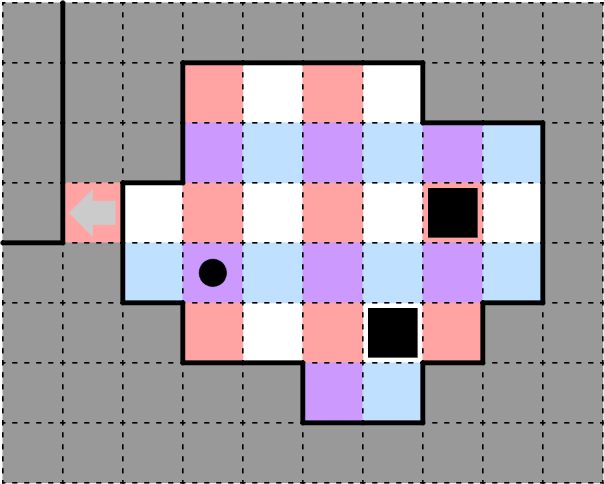
Applying parity on a subarea
Which exits must be used leaving out the green area?Solution
You might be wondering. Why are we talking about multiple paths? The actual rules for Alcazar doesn't actually use multiple paths.
Well, true. For the entire grid, this is true. But the power of our analysis is that it's applicable even for subareas.
Consider the following example. This time, the puzzle by itself is open with not much analysis to do (the dark excess is =0). However, let's consider the green area.
In the green area, the dark excess is −2. So we need at least 4 light exits. There are exactly 4 available: A, C, D, F. So we know all of them are used, and that exits B and E are not used. This allows us to draw segments inside the grid, as well as walls that we know the path cannot use. Hopefully it's clear that being able to do so is very helpful, and possibly allow further deductions down the line.
The reason we talk about multiple paths is because, in a subarea like this one, it's not true that there will only be one path visiting it. There can be multiple paths inside the area, because our solution path might visit and leave it multiple times. But, as we can see, parity is still very useful and applicable, just with a little change in the statement of the theorem.
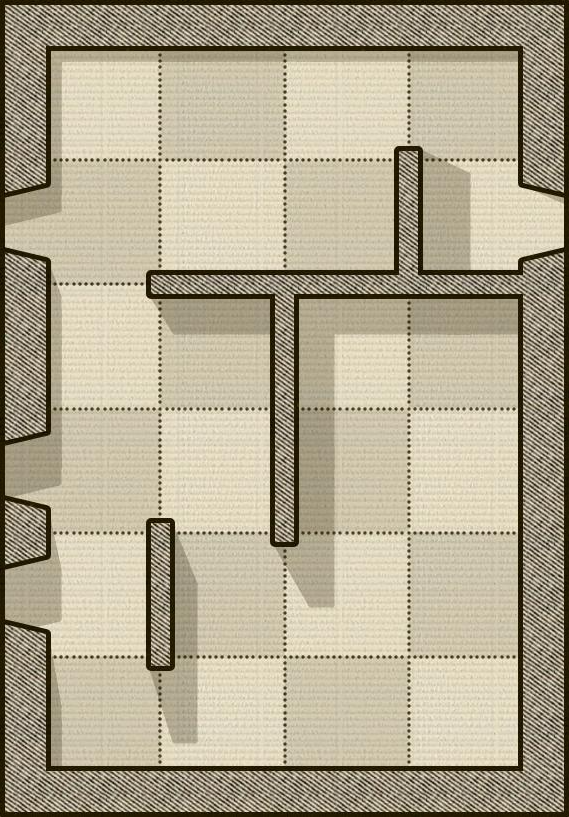
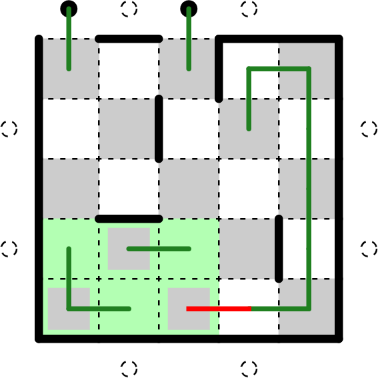
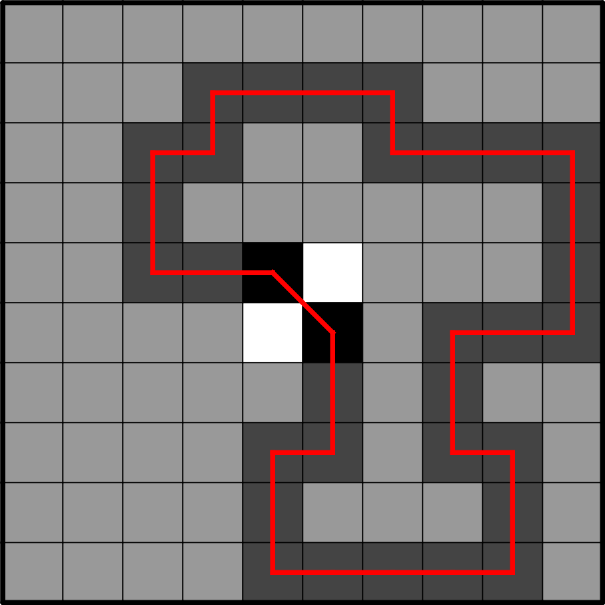
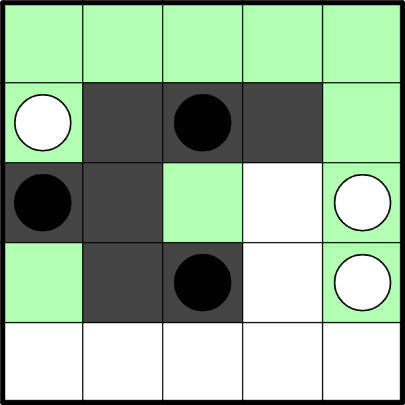
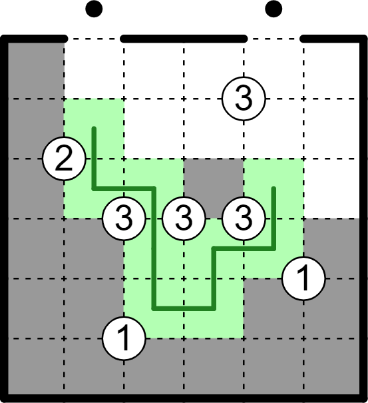
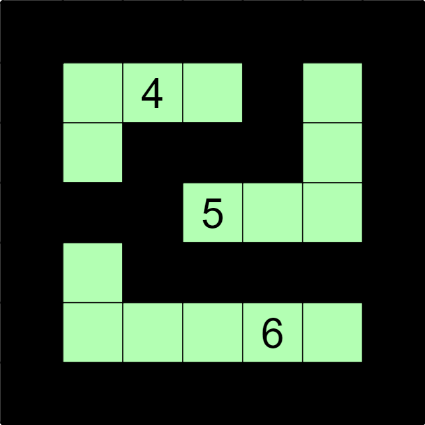
Solving my Alcazar puzzle
Alcazar puzzle, by me
(Click to try solving)
So, it's time to get back to my Alcazar puzzle. You've seen the power of using parity; it's time to apply it for real.
If you haven't done so, try solving the puzzle on your own first. Once you're ready, click the spoiler box below to read the full solution path.
Logical solve path to the puzzle
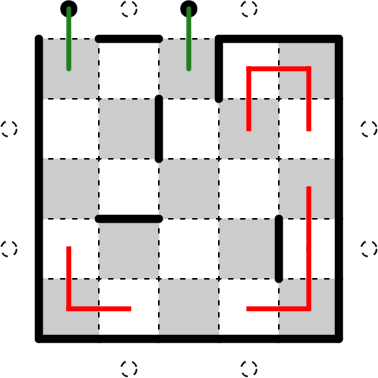
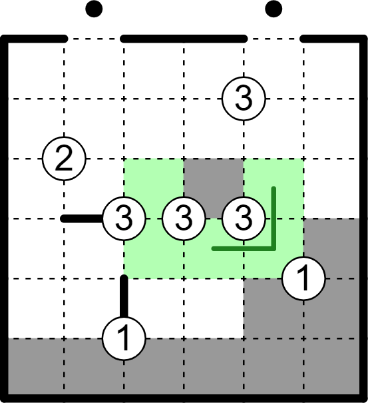
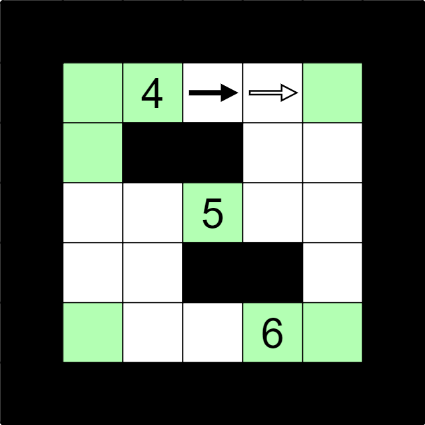
Solving the puzzle, step 1
The puzzle has dark excess +1, so the solution path has 2 dark exits. (Remember that, since we're considering the whole grid, we know there is only one path.) There are only 2 dark exits on the grid, which we must use. In addition, all the light exits are not used.
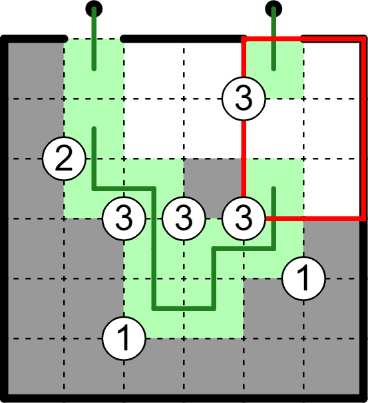
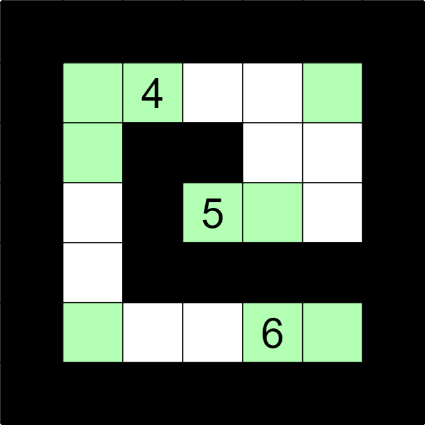
Solving the puzzle, step 2
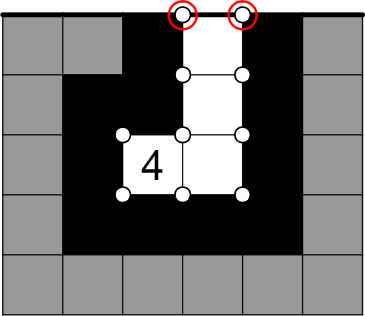
Having these walls allows us to draw several lines, mainly along the right side. These are simply about completing corners. We have to visit all cells, including corners. But a corner (or a tunnel) only has two exits into the cell, which we obviously must use.
Alternatively, you can be cheeky and apply parity on a subarea, where the area contains only one cell, the corner cell itself. Don't believe it? Try formalizing the argument yourself.
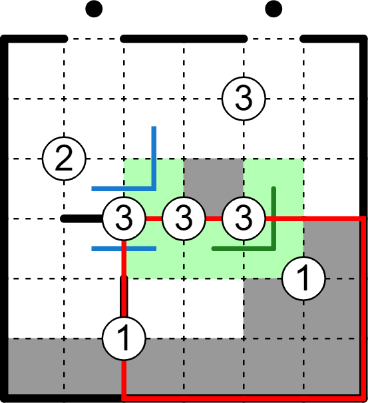
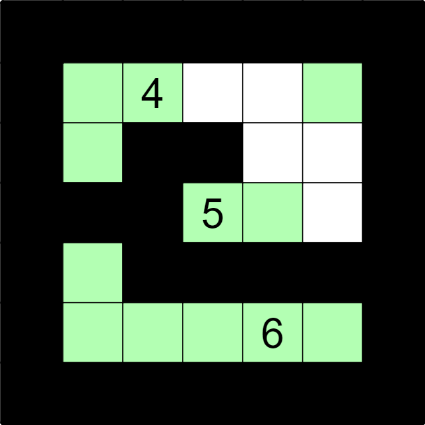
Solving the puzzle, step 3
The top-right of this puzzle is interesting. We can't close the loop early; we need a single solution path visiting all the cells, not a path plus a loop. So we can extend a segment downward.
But we can also use parity to reason the same way. The top-right green area has dark excess =0, so there are an equal number of dark and light exits. We must have at least 1 of each, but there is only 1 light exit available, which is exactly the line we draw.
This also explains why the corollary can say we have at least 1 dark and 1 light exit. If we don't have any exit at all, we end up with a loop; our solution path cannot visit it. So, this loop avoidance is somehow also an instance of parity. When I said parity is extremely powerful, it's because it also encompasses various other kinds of deductions.
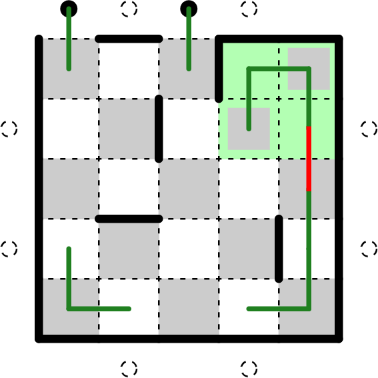
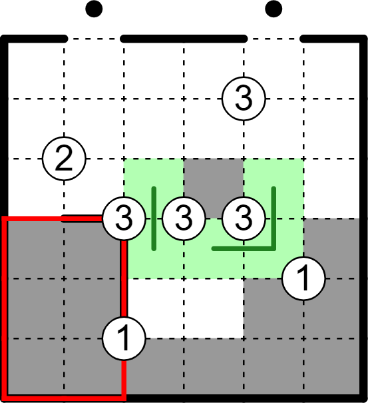
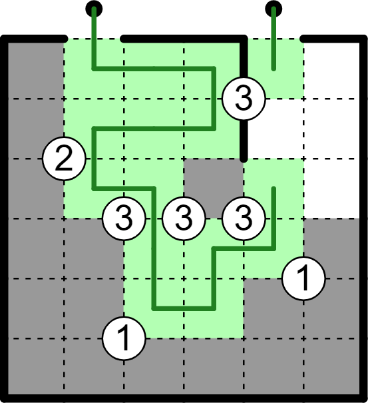
Solving the puzzle, step 4
The previous step might have been doable without parity, simply by avoiding a clear loop. This step is more difficult to spot, and the next one even harder, but they are all again instances of parity.
The green subarea on the bottom-left has dark excess =0, so it has at least 1 dark and 1 light exit. The only dark exit available is marked.
We might have been able to see this without parity: the cell on the top-right of the green area cannot go left and down, because that makes a loop. So at least one of its exits must go right. Indeed, this is the exact same argument we use to prove our parity-based theorem works.
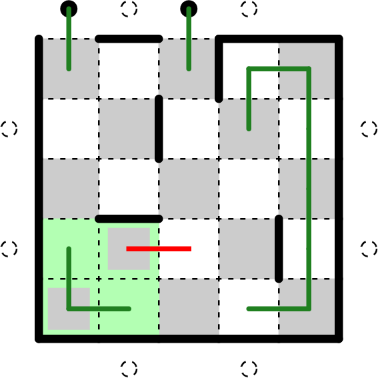
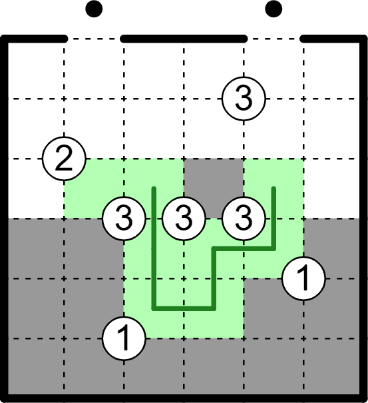
Solving the puzzle, step 5
Now the green subarea grows. The argument is still the same: the dark excess is still =0, so the only dark exit must be used.
This technique is known in the logic puzzle community. (Of course, as I'm sharing it with you.) It's known under the name "parity bouncing", because we are using parity over and over again. The subarea, in which we apply parity on, is growing larger and larger, and each one creates a new segment. Most often, the segment is the result of having a possible new exit blocked by a wall, hence why it's called "bouncing"; it feels like bouncing around the grid.
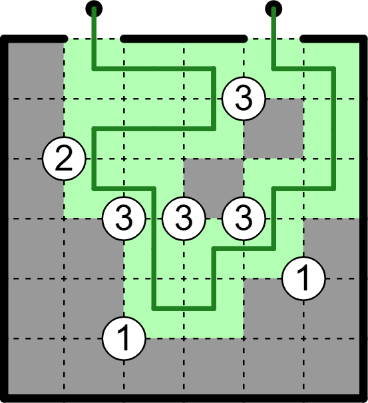
Solving the puzzle, step 6
The segment we drew just now is very important, because it gives us a new corner. This new corner, in turn, connects with the segment we drew in step 4. I will leave the final steps to you, but you can imagine how the segments continue connecting along the bottom-left, and how the puzzle becomes much more approachable after this.
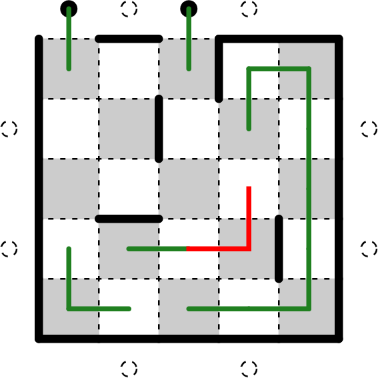
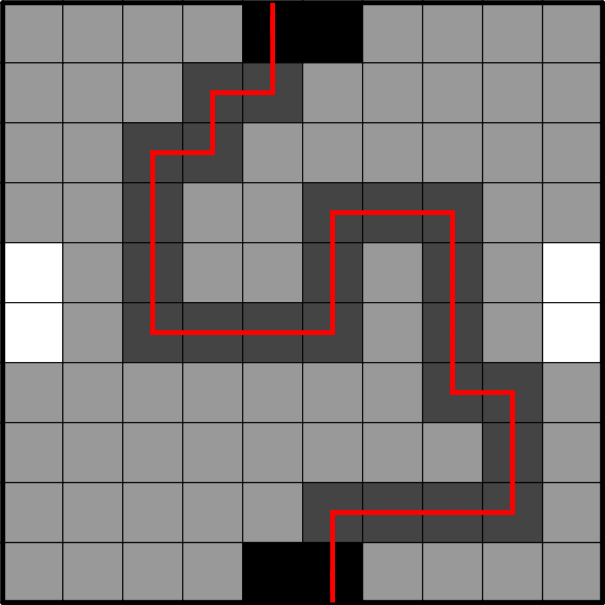
A different, slippery puzzle
Barns (Path) puzzle, by me
(Click to try solving)
Let's do a slightly different example. This was also presented in my talk; in fact, I gave this puzzle before I started the talk proper, so people could look and think about it while I was talking.
The rules are the same as Alcazar. However, there are now ice cells. Ice is slippery; when you're on ice, you may not turn. However, ice cells may be visited twice: you may cross an ice cell on one axis (horizontally or vertically), and later cross the same cell on the other axis.
(The genre name "Barns (Path)" is just a technicality. There's a logic puzzle genre called "Barns" in which the rules are the same, except you draw a single loop on the grid instead of a path. You don't need to know this.)
Once again, you can try the puzzle yourself first, and then read the solve path below.
Logical solve path to the puzzle
Solving the puzzle, step 1
We give the checkerboard coloring again. Since we have one path with 2 light exits, the dark excess will be −1.
The problem is that there are 13 dark cells and 12 light cells, so the dark excess is currently +1. There is no way to modify the exits, so we have to change the dark excess. What?
Solving the puzzle, step 2
In this puzzle, we are not limited to visiting exactly 13 dark cells and 12 light cells. Ice crossings allow us to change this number. A crossing essentially counts the cell twice. The cells along a path will still alternate colors, but the same cell might serve as two different cells along the path.
This fact is what we're using here. The dark excess is currently +1, and we have to bring it to −1. That means we need to add 2 extra light cells. This can be done by making a crossing on the two light ice cells. By doing so, the path now uses 13 dark cells and 14 light cells, giving a dark excess of −1 as desired.
Solving the puzzle, step 3
We can extend the deduction. The dark excess is −1, which is good, but this may still change with other crossings. However, there are no more light ice cells to be crossed, so the dark excess cannot go any further negative. That means, if we ever make a crossing on a dark ice cell, the dark excess will increase and cannot decrease any more. Since this cannot happen, we know the dark ice cells cannot be crossed at all.
The rest of the puzzle is left to you; it's simply a lot of corner filling. The key idea behind the puzzle is all done; it's about determining the crossings by using parity.
Parity in path puzzles: conclusion
Final test (Alcazar), by me
(Click to try solving)
All this talk about parity in path puzzles has been quite meaty, but it shows how versatile parity is. By not having to care about how exactly the path looks like, we can analyze the puzzle in a much more high-level view, counting up cells of various colors and so on. The theorem is also applicable for subareas with just a small change, and this theorem is very powerful and flexible, able to handle areas of any size with ease.
As a parting gift for this section, I leave you with one final Alcazar puzzle to test your understanding. Good luck!
(During the talk, I presented this puzzle without comment as a final picture of my slides, letting people to recognize it's a puzzle they can solve. This is almost the same puzzle; the difference is I added a couple of walls near corners so that a corner is not automatically ambiguous.)
Parity coloring
The previous section talked about the applications of parity in path puzzles, with some powerful theorems that apply broadly. What about other kinds of puzzles?
I gave it a thought, and I came to a conclusion. The flip-flop nature of parity is less evident in other kinds of puzzles. However, the coloring is still useful. In path puzzles, we color the cells in a checkerboard pattern, and pretty much all our deductions come from this coloring. This idea of coloring the grid is what we will carry to other kinds of puzzles.
Coloring in region division
Can you divide it into dominoes?
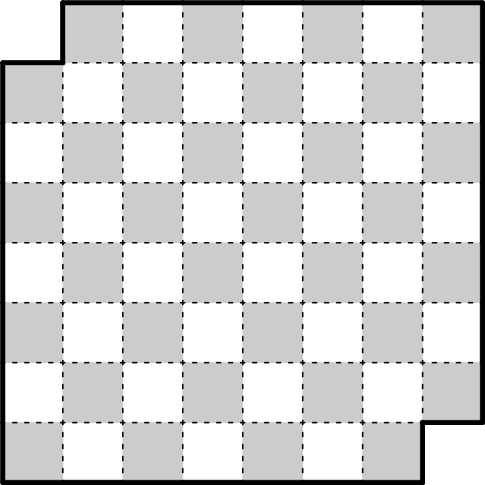
Consider the following grid, which is the chessboard with two corners chopped off. The grid has 62 cells remaining. Is it possible to divide it into 31 dominoes?
This is a well-known mathematical problem called the mutilated chessboard problem. The answer is no, it's impossible to divide it into dominoes. But how can we prove it, other than simply trying every single possible case?
Well, it is a mathematical problem, so it sure has a mathematical solution. The key insight is, after coloring the grid with a checkerboard coloring (as we have done here), a domino will always use 1 dark and 1 light cell. Therefore, no matter how many dominoes we have, the number of dark cells and light cells should be equal. Although our mutilated chessboard has 62 cells, they don't come in equal quantities: there are 32 dark cells and 30 light cells. So it's impossible to divide it into dominoes.
Divide into dominoes. What dominoes can you be sure of?
The previous example is great as a mathematical problem. For puzzles, though, especially logic puzzles, usually you want to actually have a solution. So let's look at a different example.
Again, the goal is to divide this grid into dominoes, ignoring the black holes as they are not part of the grid. There are many solutions, but you can draw some of the dominoes for certain: they are used in all possible solutions. What are they?
We can use a similar idea as above. This time, look at the cells on row 6 and below. There are 9 light cells but only 8 dark cells. That means, one of the light cells here must use a dark cell strictly above row 6. The only possible way to do so is the dark cell on E5: there is a domino E5-E6.
Is that all we can say, though? Well, no. We can extend the argument. Now that we draw the domino E5-E6, there are 8 light and 8 dark cells on row 6 and below (ignoring E6 that is already paired). So we have a balance. Can any of them extend above row 6?
We cannot. Why? A domino extending out of row 6 will be on B6 or D6 extending upward. These are both dark cells. If there's any such domino, then we're down one dark cell in our region (of row 6 and below). So we will once again need to pair one light cell to something above row 6. But there's no more light cell that can do so. Therefore, none of the dominoes can extend above row 6 any more. Therefore, B5 and D5 cannot be part of a domino going down to row 6; they have to point up to row 4. This gives the dominoes B4-B5 and D4-D5.
An alternative way for this argument is to consider the cells on row 5 and below, instead of row 6 and below. There are 11 light cells and 9 dark cells, so two light cells must be part of dominoes that extend above row 5. These can only be B4-B5 and D4-D5.
Finally, due to these two dominoes, C4 is nearly trapped; there's only one way to extend it as part of a domino, making C3-C4. This gives our four fixed dominoes: B4-B5, C3-C4, D4-D5, E5-E6. I'll leave it to you to verify that these are the only fixed ones; any other domino is not fixed, there's a solution not using it as a domino.
It's worth mentioning why we're giving this coloring. When we talked about parity earlier, the goal was: no matter what the next step of the path would be, its color would be the same. As mentioned before, we're trying to find an invariant.
This is also why we're using the checkerboard coloring. By doing this coloring, we know a domino will always use 1 dark and 1 light cell. It is an invariant, and it helps us understand the big picture much more easily. We can count up the cells and know the dominoes will require the counts to be the same.
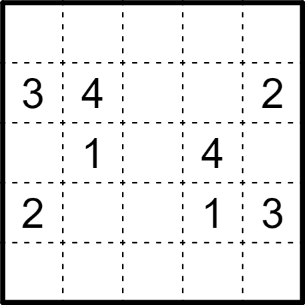
Complicated region division problems
Where is the hole so the rest can be divided into 1x3?
Finally, I want to discuss one more example in region division. I will say that this is straying quite far from what's usually found in logic puzzles; this will be more likely found as a mathematical problem. But the line is vague, so I'll include just this one as an example.
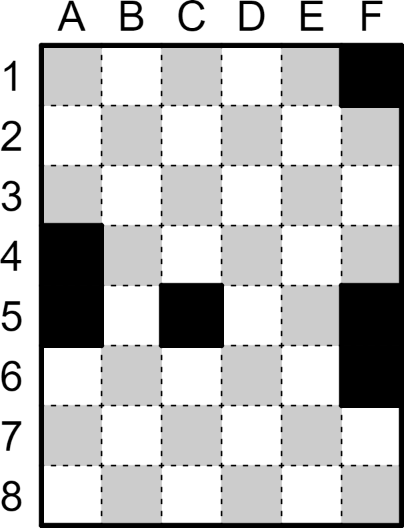
Consider a 8x8 board as pictured. Don't think about the coloring yet. A 8x8 board has 64 cells. We want to remove one of the cells, and divide the remaining 63 cells into 21 rectangles of size 1x3. Where can this hole be?
We will use parity coloring, but this time, we're going to use more than two colors. However, the core insight is the same as before: we want our rectangle to always cover the same amount of cells of each color, so that our proof works no matter where the rectangle might be.
For that reason, we're going to use three colors: red, green, and blue, as shown on the picture. When we color it this way, we have 22 red cells but only 21 green and 21 blue cells. So the removed cell must be a red cell.
Same coloring, but rotated
That still leaves quite a lot, but wait! This is not the only possible coloring with three colors. We can rotate the coloring so each color is diagonally slanted upward instead of downward. Once again, the removed cell must be a red cell with this coloring.
Both our arguments are correct. The hole must be red in both coloring. There are only four such cells: C3, C6, F3, F6. The hole must be one of these. (In addition, because the grid is clearly symmetric, if we can divide the grid with a hole on C3, we can simply rotate it to obtain a solution with any other holes.) I'll leave it to you to find a solution; it's possible to remove C3 and divide the rest into 1x3 rectangles.
In any case, this kind of argument is getting quite complicated and is not something usually found in logic puzzles. I believe the main reason is that the fun is in finding the argument once; after you find it, you'll likely just apply it the same way. Compare with Alcazar, where even though you know about parity, it's still a challenge to figure out where you can apply it. However, these conundrums make for interesting math problems, and you might find more in mathematical contests.
I'll leave this section with a math problem that I thought of while preparing this. I will say it's not easy at all, and like the above example, this is much more math than puzzle. Still, you might find it interesting. Good luck!
Consider a 99x99 board. Remove one cell, and divide the rest into rectangles of area 4 (that is, size 1x4, 2x2, or 4x1, possibly a mixture of them). Where can this removed cell be? Determine all the possible cells.
Checkerboard regions
Bilattice puzzle, by me
(Click to try it; no answer check)Example Choco Banana puzzle and its solution
(Not an example of Bilattice!)
I'm sure you see a puzzle and are immediately interested to try it first, so here are the rules.
Shade some of the cells black. Each number indicates the size of the island it's on, whether white or black.
That's all, have fun! Unfortunately there is no answer check available for the puzzle, so you just have to celebrate it yourself when you think you have the solution.
Oh, are you done? How was it?
Up until now, we have been talking about coloring the cells. There is a different kind of coloring that appears quite often: we color regions instead of cells. Huh?
I've seen several puzzle games and logic puzzle genres with the following property. The objective is to shade some cells black. However, clues usually refer to the "islands" formed by them — an "island" being a mass of cells that are connected side by side (not only at a point). For example, a number might refer to the size of the island containing it.
Puzzle game examples include Bilattice, Islands of Insight, and Taiji, and I'm sure there are others I don't remember. Logic puzzle genres include Choco Banana, Light and Shadow, and Nurikabe. (An example Choco Banana puzzle and solution is shown; see if you can guess the rules.)
In fact, cluing the size of the island is one of the clue types in Bilattice, explaining why I called the puzzle a Bilattice puzzle. Technically this is a spoiler, but it's also the first clue type you find in the game, so.
For me, it's quite fascinating that you're shading cells, but the clues are about the regions. The regions are implicit, coming out from which cells are shaded and which aren't.
Looking at it another way, here's a different way to phrase the rules. Divide the grid into regions, such that we can color the regions using two colors, and no two regions of the same color share any side. The last bit is because those regions would otherwise merge and get counted as a single region. The Choco Banana solution shows this duality: I shaded some cells black, but I also drew borders to indicate the regions.
By drawing the regions borders instead of shading cells, one peculiar property arises: there is no T-junctions anywhere inside the grid.
Why? Well, circling around any point, we must always alternate colors around the region; otherwise we have two regions of the same color bordering each other. But with a T-junction, we will change colors three times before returning back to our original region. We end up on the wrong color. If we start with a white region, then circling around a T-junction, we will see a black region, then a white region, then... back to our original region, which is white, but it should have been black. That doesn't work out. That's why there is no T-junction. (T-junctions on the edge are fine, because the outside of the grid doesn't have any color.)
More impressively, the converse direction applies: if there is no T-junction anywhere inside the grid, then we will be able to color the regions with two colors. Unfortunately, the proof is quite complicated to write out, relying on graph theory, so I will skip it for now. Maybe in a future update I will include it here.
In any case, this equivalence greatly helps puzzles, both solving and writing. Due to the duality, both shading cells and marking region borders are helpful. Sometimes you don't know whether a cell will be black or white, but you know it's of the same or opposite color as a nearby cell, and you can still mark a region border in this case.
The region borders also help a lot with avoiding T-junctions. Once I know three borders around a point, I can draw the fourth border, since I have to make a plus-shaped crossing instead of a T-junction. Or if I know two borders around a point and one segment that can't be a border, then the last segment on that point can't be a border either.
Finally, back to the puzzle. I told you there was no answer checking? Sorry, I was lying. There's answer check, but you have to draw the region borders instead of the shaded cells. (Well, if you were shading cells, there would be two solutions, because you could change all black to white and vice versa.)
Coloring based on behavior
A puzzle in A Monster's ExpeditionColoring cells by behavior in AME
Finally, there is one unusual way to apply coloring. I think it's quite rare; I have this one example, and I'm having trouble thinking of anything else. But it's still a truly intriguing example, so I'm including it. (Also, it was included in my talk, so I feel I need to include it here too.)
The above is a puzzle from A Monster's Expedition. It's a great game, and if you haven't played it, you should. Unfortunately, I won't describe the full mechanics or anything; if you're not familiar with the game, look up some Let's Play videos to understand the mechanics. This is an early puzzle, so you don't need to know that much to understand the puzzle. I will spoil this puzzle entirely, though, so that's a spoiler warning.
What I found in A Monster's Expedition is that you can exhibit some sort of parity/coloring on the cells, where the log will behave differently. By giving four colors as shown in the animated example:
On a purple cell, the log is always standing upright.
On a red cell, the log is always laying down vertically.
On a blue cell, the log is always laying down horizontally.
On a white cell, the log cannot stay still; it is rolling somewhere.
This coloring persists over the entire grid. Without anything else affecting the log, it is always going to stand upright on a purple cell, no matter which purple cell you're bringing it onto, and so on.
Changing the parity
However, it's possible to change the parity/coloring, by utilizing blocks. Note that, normally, the log cannot stay still on a white cell. However, a block may stop the log from rolling further. If the log stops on a white cell, this is a problem, because our coloring is no longer correct.
The solution to this is to revise the entire coloring. If the log stops laying down horizontally, then well, that cell has to be a blue cell, and we color the entire rest of the grid to match. After hitting this block, the log will now behave under the new coloring. The second example shows this in action.
Using parity to solve the puzzle
It's possible to use this ability to change parity in order to plan solving a puzzle.
If we try to give a coloring to this puzzle from the actual game, we find that the log will have to end up on a red cell (the marked arrow). However, this is a problem, because the log also has to be laying down horizontally, in order to become a bridge for us to cross. A red cell means the log is laying down vertically, so the orientation doesn't match.
The solution is to change parity. There's a block we can use to change the parity (in the actual level, this is the pedestal with the backpack). By rolling the log to that block, we change the parity, and now our destination is a white cell.
A white cell is not enough, though. The only way for a log to get to a white cell is by rolling a log there. The only way to get to the goal is by rolling from the right, and that means the log will be vertical. So we have to change parity once again. It is not depicted in this animation, but it's possible to do so — by using the stump left over from knocking the log down.
The main idea behind this is how we can plan ahead the solution very easily by using parity, and the ability to change parity. We know we have to change parity, so we can simply look where we can do so. Once the color of our destination matches the orientation we need, we can simply bring the log over.
Looking from higher up, the coloring we gave to the grid serves to dictate the behavior of the log. No matter what cell exactly is the log on, its color will tell its orientation: standing up, laying down in what axis, and so on. Being able to color the grid makes our reasoning much simpler, in the same vein as all the parity and coloring we've done previously.
Topology
Topology is the study of objects under continuous deformations. It's about properties of an object that remain the same even when the object is stretched and twisted. But it does not include transformations like poking a hole or tearing it apart. Basically, the transformations are continuous: nearby points remain near, faraway points remain far.
In puzzles, topology often comes in the form of connectivity. Two points have to be connected, either with a path or a series of cells or something else. We might not yet know the exact path — it's something we're solving for, after all — but we may know they have to be connected, and that alone may lead to some logic and deductions.
The checkerboard lemma
The checkerboard lemma
Some logic puzzle genres, such as Cave and Yin-Yang, contain the following two rules:
All black cells must be connected (through side by side connections, not just diagonal).
All white cells must be connected (similarly).
These two rules are enough to invoke something called the checkerboard lemma. The statement of the lemma is simple: there is no 2x2 area where the cells are colored in a checkerboard pattern.
Why is that? It's something to do with topology. Consider the illustration. The black cells must be connected in some way. Once we do this, we can draw a path along the black cells, and a final diagonal cut to form a closed curve. A closed curve divides the grid into an inside and an outside. The two white cells are on opposite sides of the diagonal cut, so they are on opposite sides of the curve: one inside, one outside. As such, it's impossible to connect the white cells without crossing this curve.
This lemma is very important in these puzzles. The main use is that, if three of the cells are filled in a checkerboard pattern already, then the last one must not create a checkerboard pattern, and so we can deduce its color.
The border connectivity lemma
The border connectivity lemma
But that's not all! Besides the checkerboard lemma, any puzzle with those two connectivity rules (all blacks connected, all whites connected) also satisfies a second lemma that I call the border connectivity lemma. Along the border of the grid, it's impossible for the blacks to be on two or more separate segments; similarly with white. That is, all the black cells on the border must be contiguous as a single solid segment, and similarly with the white cells.
The proof is actually similar. Consider the illustration. The black cells must be connected, and this connection must go through the center of the grid, since there are white cells along the border on both sides. But after drawing this connection as a path, we have just divided the grid into a left part and a right part; there's no way for white cells from one part to cross and connect to the other.
Note that if at least one side is missing white cells, then it's possible to connect the black cells along the border on that side. Then, although this path still divides the grid into two parts, one of the parts is empty, so there's no connection of white cells required across the path.
Notice how similar the proof is with the checkerboard lemma. In fact, we can connect the two ends of the path along the literal border of the grid (one way or another), and we end up with a closed loop: the white cells are again split, one of them inside the loop and another outside the loop.
We can go even further. Visualize the grid as if it's on a sphere; contract the outside into a single point. Then, the border connectivity lemma is nothing more than the checkerboard lemma applied to this one point! Sure, the checkerboard lemma only says about 2x2 shapes, but it can be generalized (especially to triangular grids and such) that there's no point in which the colors alternate. This is exactly the border connectivity lemma.
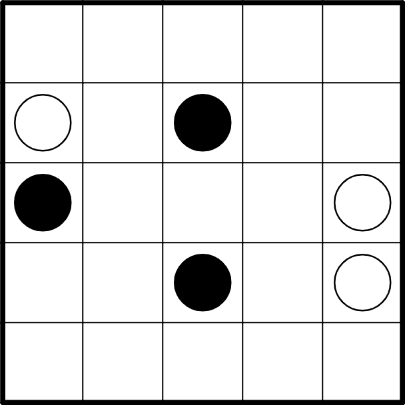
Your test: a Yin-Yang puzzle
Yin-Yang puzzle, from puzz.link example
(Click to try solving)
To test your understanding, here's a Yin-Yang puzzle. Shade some cells black. All black cells must be connected side by side, but there may be no 2x2 area of black cells. All white cells must be connected side by side, but there may be no 2x2 area of black cells. Cells with white circles must remain white, cells with black circles must be shaded black. Simple enough? Good luck!
This puzzle was not written by me. I took this puzzle from a website called puzz.link, where people can create links to logic puzzles that can be played online (including an automatic checker). I will share the full link below, inside the spoiler block with the full solution.
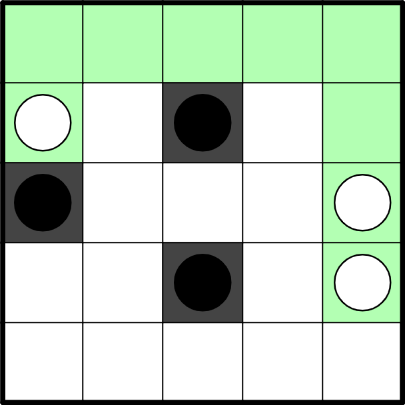
Logical solve path to the puzzle
Solving the puzzle, step 1
In "shading" puzzles such as Yin-Yang, it's often useful to mark cells that are known to be white. Here, I'm marking them with green. Some people prefer to use a dot on the cells. But either way, it's important to distinguish cells that are known to be white from cells that are unknown.
Either way, we invoke the border connectivity lemma. There are two masses of white cells on the left and the right sides of the grid. They have to be connected through the border. One way (downward) is blocked by a black cell, so it has to be along the top edge.
Solving the puzzle, step 2
We now use the rule specific to Yin-Yang: there is no 2x2 area of entirely the same color. The top corners are almost full of white cells.
Solving the puzzle, step 3
This time, we use the checkerboard lemma. There is a 2x2 area that's almost a checkerboard on the left side. To avoid that, we have to put a black cell. This in turn creates a 2x2 area almost of the same color, so we can put a white cell at the middle of the grid.
Solving the puzzle, step 4
We now have another instance of a 2x2 area that's almost a checkerboard. We get a new black cell, which in turn forces a white cell to avoid another 2x2 area of black.
Solving the puzzle, step 4
Finally, recall that all white cells must be connected. The center one needs to escape to the right. The one near bottom-left has to hug along the entire bottom wall. One cell remains, which is black to avoid a 2x2 area of white. This solves the puzzle.
As mentioned, this puzzle was taken from the example puzzle used by puzz.link. As you can see, the original rules for Yin-Yang asks you to place circles instead, but I find shading cells to be much easier to understand. The rule "all cells of a color are connected" is impossible to see with circles.
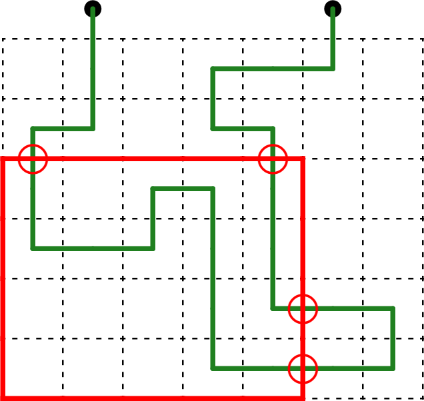
Jordan curve theorem
Jordan curve theorem: there are an even number of intersections"Completing" the intersections with Jordan curve theorem
Let's move to a different setting, back to path puzzles. This time, we don't need to visit all cells. Parity becomes less useful, because by skipping cells, we can no longer be sure of the counts of the colors. Instead, we will use topology, specifically the Jordan curve theorem.
Jordan curve theorem states that any closed loop divides the plane into an inside part and an outside part. It's famously known as a theorem with a very intuitive and obvious statement, but it's very difficult to prove, because a "closed loop" in mathematics can get incredibly ugly. That said, for puzzle purposes, the loops will be simple and nicely behaved, and the proof for the theorem is easy in this case.
In puzzles, the common application is to consider a path. The path is not restricted by the loop in any way; it may intersect the loop however many times. It may also touch the loop, but if it doesn't cross the loop, it's not counted as an intersection.
With this, the path is going to alternate between inside and outside the loop after each intersection. (Look, another instance of parity!) If the path intersects the loop an even number of times, then its endpoints are on the same side: both inside or both outside the loop. If an odd number, then the endpoints are on opposite sides.
In the first example, we see a green path that intersects the red loop a total of 4 times. This is an even number of times. Indeed, the endpoints of the path are both outside the loop.
In the second example, we see a puzzle in progress. (In path puzzles, it's common that we have several partial short paths that we later manage to join up together.) The entrances into the red loop are almost entirely determined: we have several intersections, and we have several entrances that cannot be used as they would lead to a branching/intersecting path. Only one entrance remains, and we can use Jordan curve theorem to determine it. We have 3 intersections so far. Since the endpoints are both outside, we need an even number of intersections; that means the last one has to be an intersection, and we can draw the line going in.
Notice that we have actually used this idea earlier with the checkerboard lemma. We drew a loop defined by the black cells; this divided the grid into an inside and an outside. The white cells were split, so any path connecting the white cells had to cross the loop an odd number of times; in particular, at least once.
When moving to a path setting, though, we can be more precise. In the shaded cells setting, if we draw paths connecting cells, the path may branch and form spurious intersections with the loop. We know there will be at least one intersection, but we can't be sure of the parity. In a path setting, though, there is no such branching; all intersections are part of the path, so we can count up the parity.
Your test: a Linelith puzzle
Linelith puzzle, by me
(Click to try solving)
Here's an example puzzle. Again, draw a path, and you don't need to visit all the cells.
What are the numbers doing? A number indicates how many cells are used by the path around it. For example, a clue of 3 means 3 of the 4 cells touching the clue will be used. This clue type appears in Linelith, so I'm calling this a Linelith puzzle.
Feel free to give it a try! That said, I admit this example is particularly difficult and is definitely a jump up from the previous section. Don't feel discouraged if you can't solve it. Click below to see the solve path.
Logical solve path to the puzzle
Solving the puzzle, step 1
We're going to mark some borders to indicate that the path can't go through it. The main idea is that it will be very helpful to draw some Jordan curves using these borders.
A clue of 1 tells quite a lot. We cannot use two cells around it, so we cannot cross any border touching the 1. That allows us to draw a plus-shaped border for each clue 1.
Solving the puzzle, step 2
We can now draw some closed loops at the bottom. Each of these loops has at most one remaining entrance, and we haven't drawn any path, so we don't have any intersection going into it. Therefore, the entrance must also be unused. This means the path doesn't enter the loop at all, and so all its cells are not used. Here I mark unused cells in gray.
One particularly tricky example is the big loop. It has a diagonal line as part of the loop. The path cannot cross this diagonal line. The path may still use the cell, as long as it doesn't cross the line. That is, it may make a corner facing top-left, but no other possibility is allowed (as otherwise the path enters the loop).
Solving the puzzle, step 3
Due to the unused cells around the bottom-right 1, only one of its cells remains; we know it has to be used, so the path makes a corner here. In turn, this corner uses three cells of the middle-right 3, so its remaining one cell is not used.
Continuing to the left, the middle 3 already has one cell marked unused, so the remaining three cells are used. Finally, two cells are marked used for the middle-left 3, so there's one more cell. This means the path cannot make use of the border to the left of this 3.
Besides marking unused cells in gray, I also mark used cells in green, even if I don't yet know how the path goes on them.
Solving the puzzle, step 4
The following step is tricky and requires a bit of lookahead. Unfortunately I don't know if there exists a cleaner step. While writing the puzzle, I recognized this issue, but I couldn't find a better way to construct the puzzle to avoid such step either, so this will have to do.
The red loop already has one intersection (on top-right of the loop), so there are an odd number of intersections remaining. There are two more places for an intersection (on top-left), and we need an odd number of them, so exactly one of these two places is passed by the path.
However, if we do the left one, we run into trouble. Since we then can't use the top one, the cell above it is a corner, as the blue lines show. But doing this causes us to use four cells for the 3, which is not allowed. So we will have to use the top one.
Solving the puzzle, step 5
We now use Jordan curve theorem again. After marking the path going up from the previous step, we know the path can't go left, hence why we can draw a new border. Then the red loop only has one entrance, which cannot be used. So the entire loop isn't visited and we can mark it all unused.
Solving the puzzle, step 6
This means the bottom-left 1 has one remaining cell, which must be used. The middle-left 3 also has one unused cell, so the remaining cell (top-left of the 3) is used.
Solving the puzzle, step 7
We cannot use the corner of the 2. So the cell we just marked as used is actually also a corner. What remains is the top half of the puzzle.
Solving the puzzle, step 8
Look at the red loop at the top-right. There are two entrances already used, and two remaining entrances. Since we need an even total, either these two remaining ones are both used by the path, or both unused.
However, if the path uses both of them, it will use all four cells of the 3. That's impossible. So both of these are unused.
Solving the puzzle, step 9
We're on the final stretch. The 3 is split into two sides; both sides must use at least one cell, otherwise there are only at most two used cells. That means, on the left side, the path must make a detour to visit this side of the 3. It ends up using both cells of the 3's left.
Solution to the puzzle
Finally, that completes the 3, so the remaining cell is unused. The right endpoint of the path has to make a detour to connect with the rest, and the puzzle is solved. Whew!
Topology: conclusion
Topology also finds a broad application in puzzles. In particular, many puzzles make good use of connectivity, which is a concept very widely studied in topology.
In practice, we're mostly just using Jordan curve theorem. If a path crosses the loop an even number of times, then its endpoints are on the same side of the loop. If an odd number, then opposite sides.
This theorem shines well in path puzzles, since each intersection of the path matters. In other kinds of connections, such as with shaded cells, paths connecting shaded cells may branch out and so we may have fake intersections. But we can still make use of the odd = opposite sides part, specifically that there will be at least one intersection. That leads to the checkerboard lemma.
Specialized argument: gridpoint counting
Some mathematical arguments in puzzles are particularly specialized. They only apply in particularly specific situations: perhaps only a single logic puzzle genre, and even then, only for puzzles of a specific structure, not all the puzzles. They tend to involve more complicated mathematical arguments, but that makes them all the more satisfying to find.
Gridpoint counting is one such argument. I included it in my talk because, to my knowledge, it was invented by me. Obviously I wanted to brag.
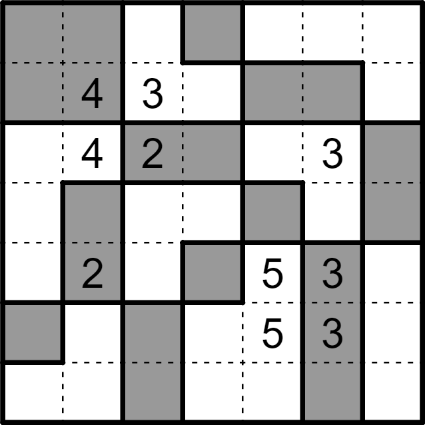
Nurikabe
Example Nurikabe puzzle
(Click to try solving)Solution to the example puzzle
To explain this argument, I need to first introduce the setting: Nurikabe.
Nurikabe is a logic puzzle genre that's very popular in the logic puzzle community. An unsolved puzzle together with its solution is shown. Some of the rules might be obvious, but there are constraints on the black cells. You know what, let me tell you the full rules:
Shade some cells black. Numbers may not be shaded. Each white island must contain exactly one number, which must be equal to its area. All black cells must form a single connected mass, but there may not be any 2x2 area of black cells.
Those are the full rules of the puzzle. You can try solving it yourself, playing around with the puzzle. Obviously you're spoiled on the solution, but you can still use it as a sandbox, see if you can figure out various logical steps in the genre.
By the way, if you've been playing Islands of Insight, you might feel these rules are familiar. That's correct; some of the puzzles in the game are actually Nurikabe puzzles. (There are a lot of other logic puzzle genres in there, by the way. The system of only applying certain rules for any given puzzle is extremely expressive.)
I gave a Nurikabe puzzle to people
Nurikabe puzzle, by me (2019-05-19)
(Click to try solving)
One day, I wrote a Nurikabe puzzle and shared it with people, including on my puzzle Twitter account (now unused). I particularly remember one interaction with someone that's already well-known in the logic puzzle community. I don't remember who; it might have been Zotmeister but my memory is failing me (and the Twitter reply has been deleted).
Basically, it was easy to find one solution for this puzzle. But they were having trouble proving it was the only solution. Logic puzzles are meant to have exactly one solution, since the solution should be able to be derived purely using deductive logic. So, how was I able to prove it was unique?
Well, the reason I shared the puzzle was because I found a math argument in the first place, gridpoint counting. I explained the argument and they were amazed. By knowing the argument, and being convinced that it is true, they were able to quickly prove the puzzle indeed only has one solution.
I would later use this argument in another puzzle in a logic puzzle contest I authored in 2020. Additionally, the argument seemed to be developed independently by a few others, since a couple puzzles using this idea appeared elsewhere. (I know of one: a puzzle by Elyot Grant in the 24-Hour Puzzle Championship 2020, postponed to 2023 for reasons we know.)
In any case, most Nurikabe puzzles don't use this argument whatsoever. After all, that's how the Twitter correspondent could end up impressed when I explained the argument; they had never seen it before. But some puzzles do use this argument, and in those cases, often this is the only way one can solve the puzzles without resorting to massive bifurcations.
So, what's the argument? Good question, let's actually get into it.
Intuition behind the argument
Failed attempts at solving my puzzle
If you try to solve this puzzle randomly, by simply drawing islands arbitrarily, you will always get into situations where you have a 2x2 area of black cells, often several. (Well, the one exception is if you get the correct solution.) The animated example shows various failed attempts; every black 2x2 is marked with a red circle in the middle.
So, what's the problem with this puzzle? Why does it feel like we keep failing to solve it?
The reason is that we have very few white cells. It's so hard to reach everything. We keep having trouble stretching our islands far enough to cover all the 2x2 areas.
When I thought about the argument, this was the key idea I had to realize. My instinct felt there was something wrong, but if I couldn't articulate it, I wouldn't have anything to start investigating it. I had to realize this key fact that the islands were too small, that the rule I kept breaking was the "no black 2x2" rule.
Okay, the islands feel too small. I kept getting black 2x2s. Now comes the realization: instead of looking at cells, I want to look at gridpoints formed by the intersections of the gridlines.
Gridpoint definition
Islands and gridpoints they touch
A gridpoint is simply a point formed as the intersection of two of the gridlines.
I want to look at gridpoints touched by an island. The example shows several islands and the gridpoints touched by them.
A Nurikabe puzzle gives the sizes of the islands. We can prove that an island of size N will touch at most 2 N + 2 gridpoints. It's not an equality; some islands have a "wrong" shape, like the square-shaped 4, and will touch less. But it's an upper bound, and it's possible to prove it by induction on N.
As such, by adding up all the islands, we have a maximum total number of gridpoints available from the islands.
At the same time, as mentioned before, every internal gridpoint must be touched. (Internal here means not along the boundary.) Why? Because if an internal gridpoint is not touched, then all cells around it are black. But this is exactly a 2x2 area of black cells, which is not allowed in Nurikabe.
As such, from the grid size, we have a minimum number of gridpoints that must be touched.
We have two bounds: an upper bound (from island sizes) and a lower bound (from grid size). In mathematics, when we have an upper bound and a lower bound and the two are close (or even equal), things happen, because you know all the extreme edge cases do occur. That's the same here: these two bounds might be close together, and gridpoint counting argument is exactly making use of this fact.
I'll let you check for yourself that, for the puzzle with 4-5-6, we actually have equality:
The upper bound is 36 gridpoints: the size 4 island touches at most 10 gridpoints, the size 5 at most 12, the size 6 at most 14. (There is no hidden island or anything, because a Nurikabe puzzle requires every island to contain one number.)
The lower bound is 36 gridpoints, because the grid size is 7x7 and it has a grid of 6x6 internal gridpoints.
Knowing and finding defects
Defect #1: Island has 2x2Defect #2: Islands touch diagonallyDefect #3: Island reaches the border
If the upper bound and the lower bound are close enough (or even equal), then there must be very few (or even no) gridpoints "wasted". Every gridpoint available from the island must be dedicated to touch every internal gridpoint, with an exception of very few points. If we can identify where we'll waste the points, then we know everywhere else, we cannot waste points.
What are the ways to waste gridpoints? There are three such ways, and I call them defects.
Defect #1: An island has a 2x2 area of white cells. This essentially makes the island more "compact", and hence touch fewer gridpoints. Every 2x2 area in the island is a waste of 1 gridpoint. Count every 2x2 area, even if some of them overlap: a size-9 island that's shaped like a 3x3 square contains four 2x2 areas, and so wastes 4 points. Indeed, a size-9 island can theoretically reach 20 gridpoints, but the 3x3 square only touches 16.
This can be proven by analyzing the inductive proof. A size N island touches at most 2 N + 2 gridpoints. The proof is that a new cell added to the island must share a side with an existing cell, and so share at least two gridpoints; that's why the new cell can add at most two new gridpoints. But, with a white 2x2, the last cell of the square only adds one point: it's already adjacent to two existing cells. That's where the waste comes from.
Defect #2: Two islands touch diagonally. I feel this is straightforward: only one island needs to touch any given internal gridpoint, so if two islands touch the same point, that's one wasted point that could have been used to cover something else.
Defect #3: An island reaches the border. Because we only need to touch the internal gridpoints, any point going to the border is a waste, and we could have used it for something in the interior.
There's a quirky thing about this last defect. It's impossible to touch only one gridpoint on the border; it will always be at least two (there's one other next to the gridpoint). So, if the upper bound and the lower bound differ by 1, it's possible to have either of the two other defects, but not this one.
Either way, those are the three kinds of defects. If the upper bound and the lower bound are close enough, then the differences come from defects, and it becomes practical to identify where they might happen. Sometimes you might not even need to determine where exactly, just a general area; if you can localize all the defects, you can still say there's no defect anywhere else.
Solving my Nurikabe puzzle
Solving my Nurikabe: avoiding defects
Back to my puzzle. As mentioned earlier, there are 36 internal gridpoints, and there are 36 gridpoints available from the islands. That means we cannot have any defect whatsoever.
What does this imply? That means none of the three kinds of defect may happen.
From defect #1: There can be no white 2x2.
From defect #2: No two islands touch diagonally.
From defect #3: No island reaches the boundary.
The first point is difficult to make use right now, although there are other puzzles in which this may matter a lot. The other two points have immediate implications, though. There are four black cells near the middle of the grid, because if any of them were white, that would be two islands touching diagonally. Also, the entire border is black, because no island can reach the border.
This doesn't immediately solve the puzzle, although it's not too difficult to finish it up. If you want, you can try working it out on your own, or click below to read the solution.
Finishing up my puzzle
Solving the puzzle, step 2
In "shading" puzzles such as Nurikabe, it's often useful to mark cells that are known to be white. Here, I'm marking them with green. Some people prefer to use a dot on the cells. But either way, it's important to distinguish cells that are known to be white from cells that are unknown.
Solving the puzzle, step 3
I think the only tricky part after that initial deduction is this one.
Consider the size-4 island. It may extend one to the right (to the black arrow), but if it extends once more (to the white arrow), then it will automatically merge with the top-right white cell. This is a problem, because the island ends up having size 5.
As such, that cannot happen. At most, the size-4 island can extend up to the black arrow. But this only gives 3 cells, so the island needs to take another cell, which must be along the left edge.
Solving the puzzle, step 4
Remember that we still have to avoid defects. We can mark a black cell (immediately to the left of the 5) as otherwise there will be islands touching diagonally. In turn, this marks another black cell (to the bottom-left of the 5): we know the size-5 island cannot reach it, so if it were white, it would be a different island and thus there would be islands touching.
By blocking the left side of the size-5 island, we know it has to extend to the right. This also forces a black cell (to the top-right of the 6) to avoid islands touching diagonally.
Solving the puzzle, step 5
We're on the final stretch. By blocking the size-6 island from going up, there's only one way to resolve it along the bottom and left edge. (Pictured)
And then the size-4 island is also blocked from going along the left edge, so it has to go along the top...
Solution to the puzzle
And we solve the puzzle.
Gridpoint counting: conclusion
And that's gridpoint counting. Quite involved, but has some wonderful insights.
Once again, gridpoint counting is a particularly specialized argument. It requires the following conditions:
No 2x2 area is all black. (So we can put a lower bound on gridpoints required, since all internal gridpoints must be touched.)
We know the areas of all white islands, one way or another. (So we can put an upper bound on gridpoints available.)
These conditions aren't very natural. Among the popular puzzle genres, only Nurikabe satisfies these conditions, so gridpoint counting is primarily used for Nurikabe puzzles.
Even then, it only applies for puzzles of a specific structure: the available gridpoints should be low enough so that it's feasible to figure out where the defects are. Many Nurikabe puzzles don't go to this length, so this argument isn't as applicable.
However, when it does apply, its power is enormous. I think the argument is beautiful, and it makes easy work of puzzles that otherwise look impossible. I'm proud to have discovered this proof, and the puzzle with 4-5-6 is one of my proudest works; I often show the puzzle to people interested in more advanced logic puzzles.
The argument also showcases how math theorems are discovered and proved. It started from the idea that the islands were too small. I then crystallized the particular issue: that I kept getting 2x2 black areas. That made me think of gridpoints, and the argument became more formalized and rigorous starting from there. Finally, it ended up with a complete proof, which I could then use in puzzles.
Nurikabe (No Touch), by me
(Click to try solving)
I'll end this section with one last puzzle.
Nurikabe (No Touch). Standard Nurikabe rules. However, islands may not touch diagonally.
Look at that! I told you about three kinds of defects that can happen in gridpoint counting. The variant rule eliminates one of them, so only two kinds of defects to consider.
That said, fair warning: this puzzle is hard. It appeared in a logic puzzle contest I wrote, 25 Years (to celebrate me turning 25 years), and it was given a pretty high amount of points, indicating it was supposed to be difficult. Yes, it does use gridpoint counting, but I threw several extra tricks on top of it. (It's also designed that way to try to defeat random guessing.) You have to analyze your argument carefully to not accidentally discard a possibility. If you manage to solve it, though, props to you. Good luck!